A scratched hardwood floor can make a lovely room look tired, especially when light catches a pale line across dark boards. The good news is that most scratches do not need a new board, a full sanding job, or a professional bill running into hundreds of dollars. Usually the damage sits only in the protective finish or the top layer of wood, and can be cleaned, coloured, filled, or resealed in an afternoon. Resist doing too much too soon — heavy sanding on a faint scratch can create a dull patch worse than the original mark. Work in order: check the depth, identify your finish, try the gentlest repair first, and move to filling or recoating only when the simpler option is clearly not enough.
Assessing Scratch Depth and Finish Type
Clean the area with a soft cloth and floor cleaner, then look at the scratch in daylight from a low angle. Run your fingernail across it. If your nail glides over without catching, the scratch is only in the finish. If it catches slightly, it has reached the wood but is still shallow. If it catches firmly or shows raw, pale wood, treat it as a deep scratch needing filling before colour work.
Next, identify your finish, because products that suit one can damage another. Most modern floors are sealed with polyurethane, a hard, clear coat — water will bead on it. Older floors may be oiled or waxed, so water soaks in slowly and the surface feels matte. Lacquer sits between the two, smooth but thinner. If unsure, test under furniture:
- Surface scratch: white line, no nail catch, no bare wood showing.
- Medium scratch: nail catches, colour broken, groove narrow and shallow.
- Deep scratch or gouge: wide groove, exposed wood, raised edges.
- Widespread wear: dozens of fine scratches and dull traffic lanes.
Quick Fixes for Surface Scratches
For finish-only scratches, start with the least invasive options. Sometimes the white line is not damage at all, but trapped dust or a shoe scuff. Wipe firmly with a microfibre cloth dampened with floor cleaner, buff dry, and check again. A white eraser can also lift rubber scuffs without chemicals.
If the line remains, a stain marker or touch-up pen for wood floors is the fastest fix. These cost about $8 to $15, come in shades such as oak, walnut, and cherry, and tint the scratch so it blends in. Apply along the grain, wipe off excess immediately, and build up thin layers rather than flooding the mark. On an oiled floor, a drop of matching hardwax oil can darken a fine line well, though that is a cosmetic disguise, not a lasting seal.
Avoid internet shortcuts on sealed floors. Olive oil and vinegar can darken a scratch for a day, but oil can turn rancid, block later finishes from bonding, and leave a greasy patch. If a quick fix still looks good after 24 hours, stop there — solved for a few dollars in under an hour.
Filler and Wax Stick Repairs
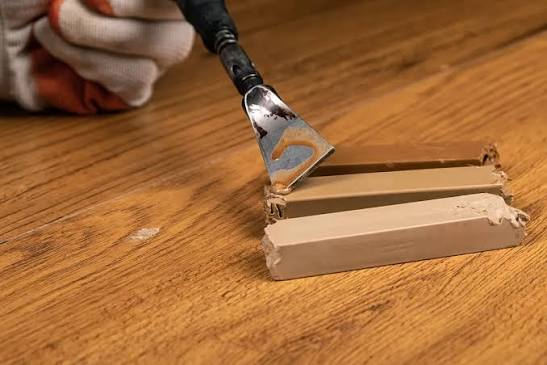
When a scratch has depth, colour alone will not hide it, because light still catches the groove. Fill first, then match the colour. Wax filler sticks are easiest for narrow, medium-depth scratches. They cost roughly $10 to $20 for a multi-shade pack, need no drying time, and can be blended by warming two colours together. Press wax firmly along the scratch, overfill slightly, level it with a plastic scraper or old credit card, and buff gently.
For wider gouges, use a water-based wood filler or two-part epoxy filler made for floors. These set harder than wax and cope better with foot traffic, but shrink slightly and need sanding, so they suit damage wider than about 2 millimetres. Apply with a putty knife, leave it a fraction proud, dry as directed, then sand level with 220-grit paper, following the grain.
- Choose wax for speed, and filler for strength and wider damage.
- Keep filler off the surrounding finish; wipe spills away while wet.
- Never use wall filler — it stays soft, crumbles, and will not take stain evenly.
- For a long scratch, fill and colour one board at a time to preserve natural variation.
Wax repairs may need refreshing after a year or two in busy areas — still far cheaper than replacing a board.
Staining and Color Matching
Colour matching is where most repairs succeed or fail, and patience matters more than skill. Hardwood varies from board to board, so aim for a close match to the boards around the scratch, not to the tin lid. Work in daylight, because warm indoor bulbs make stains look redder than they are.
Test any stain or coloured filler in a hidden spot, such as inside a closet, and let it dry fully — wet stain always looks darker. Start lighter and add colour in thin coats, wiping each off after a few minutes. Pale filler drinks up stain and can turn almost black, so apply, wipe quickly, and repeat.
Pay attention to grain as well as colour. A solid block of brown across grain lines stands out even if the shade is right. Drag a fine marker along the repair to fake one or two faint grain lines. Judge from standing distance: a repair invisible from six feet away is a success.
Spot Refinishing Techniques
If a scratch has cut through the finish and the wood still looks exposed, spot refinishing seals just that area. It works best on a single board or a small patch. Tape off surrounding boards, following the joints so any sheen difference follows a natural line instead of cutting across the grain.
Sand only the damaged section, starting with 150-grit paper if the finish is thick, then 220-grit to smooth it. Keep the block flat, move with the grain, and feather the edges. Wipe away dust with a tack cloth, apply stain if needed, and let it dry. Then brush on a thin coat of matching finish — water-based polyurethane for most modern floors, hardwax oil for oiled floors. Water-based products dry in two to three hours and cost about $20 to $35 for a small tin.
One coat often looks flatter than the floor around it. A second thin coat, after light sanding with 320-grit paper, usually brings the sheen closer. Remove tape while the coat is still tacky, and keep feet and furniture off the patch for 24 hours.
Screening and Recoating When Scratches Are Widespread
Sometimes there is no single scratch to fix. A room may have hundreds of fine lines from grit and pet claws, yet the wood and stain underneath are still sound. Repairing marks one by one is then wasted effort. Screening and recoating — also called a buff and coat — is the middle path between spot repair and a full refinish.
A floor buffer with a fine abrasive screen scuffs only the top layer of finish, giving the new coat something to grip. The floor is vacuumed and tack-cleaned, then one or two fresh coats of polyurethane are applied. No bare wood is exposed, the colour stays the same, and most rooms can be walked on in socks the next day. Hiring this out costs about $3 to $5 per square foot, compared with $5 to $8 for a full refinish; rental is roughly $60 to $90 a day.
Screening will not fix deep gouges, water stains, or peeling finish, because new finish will not bond to a failing coat. Do the tape test first: press clear tape onto a worn area and pull it off sharply. If finish flakes come away, plan a full refinish instead.
Preventing Future Scratches
Prevention is unglamorous, but it is the cheapest repair of all. Most scratches come from grit dragged under shoes and furniture legs, day after day. A few habits will protect your floor and your repairs:
- Fit felt pads to every chair, table, and sofa leg, and replace them when they flatten or collect grit.
- Place a stiff doormat outside and a washable mat inside each entrance, and shake both out weekly.
- Lift furniture instead of dragging it, and use a rug under dining chairs.
- Keep pet nails trimmed and wipe paws after muddy walks.
- Sweep or vacuum with a hardwood setting several times a week; never use a beater bar or steam mop on sealed wood.
- Use only cleaners made for your finish type, and avoid leaving standing water in repaired grooves.
Keep a repair kit in a drawer — a marker, a wax stick, and felt pads. Fixing a fresh scratch before dirt works into it is far easier than tackling it months later.
Final Thoughts
You do not need to replace floorboards to bring a scratched floor back to life. Most marks yield to a method matched to their depth: cleaning and tinting for surface lines, wax or filler for grooves, staining for colour, spot refinishing for exposed wood, and recoating when wear is everywhere. Start gently, test colours out of sight, and judge from standing height. A repair costing a few dollars and an afternoon can keep a floor looking cared for for years.
Frequently Asked Questions
Can I use vinegar or olive oil to fix a hardwood scratch?
It is better not to. Vinegar can dull polyurethane and olive oil can go rancid, attract dirt, and stop proper finish bonding later. Use a stain marker or hardwax oil made for your finish type instead.
Why does my scratch look dark instead of light?
A dark scratch usually means dirt or moisture has worked into exposed wood, or filler has absorbed too much stain. Clean it gently, let it dry fully, and if the line remains, spot sanding and refinishing that board section works better than adding more colour.
How much does it cost to repair scratches yourself?
Most single-scratch repairs cost between $8 and $35 for a marker, wax stick, or small tin of finish, assuming you own cloths and sandpaper. Recoating a whole room costs more, but is still well below replacing boards or a full refinish.
Can engineered hardwood be repaired the same way?
Yes, for surface and medium scratches, using the same cleaning, marker, wax, and spot finish methods. Be far more cautious with sanding, because engineered boards have only a thin wood veneer. Never sand through it, and avoid screening if it is thin or worn at the edges.
When should I call a professional instead of repairing it myself?
Call a professional if scratches cover most of the room and the finish is peeling, if there are deep gouges or water stains, or if you are unsure about a thin engineered veneer. A professional can confirm whether recoating will bond or a full refinish is needed.