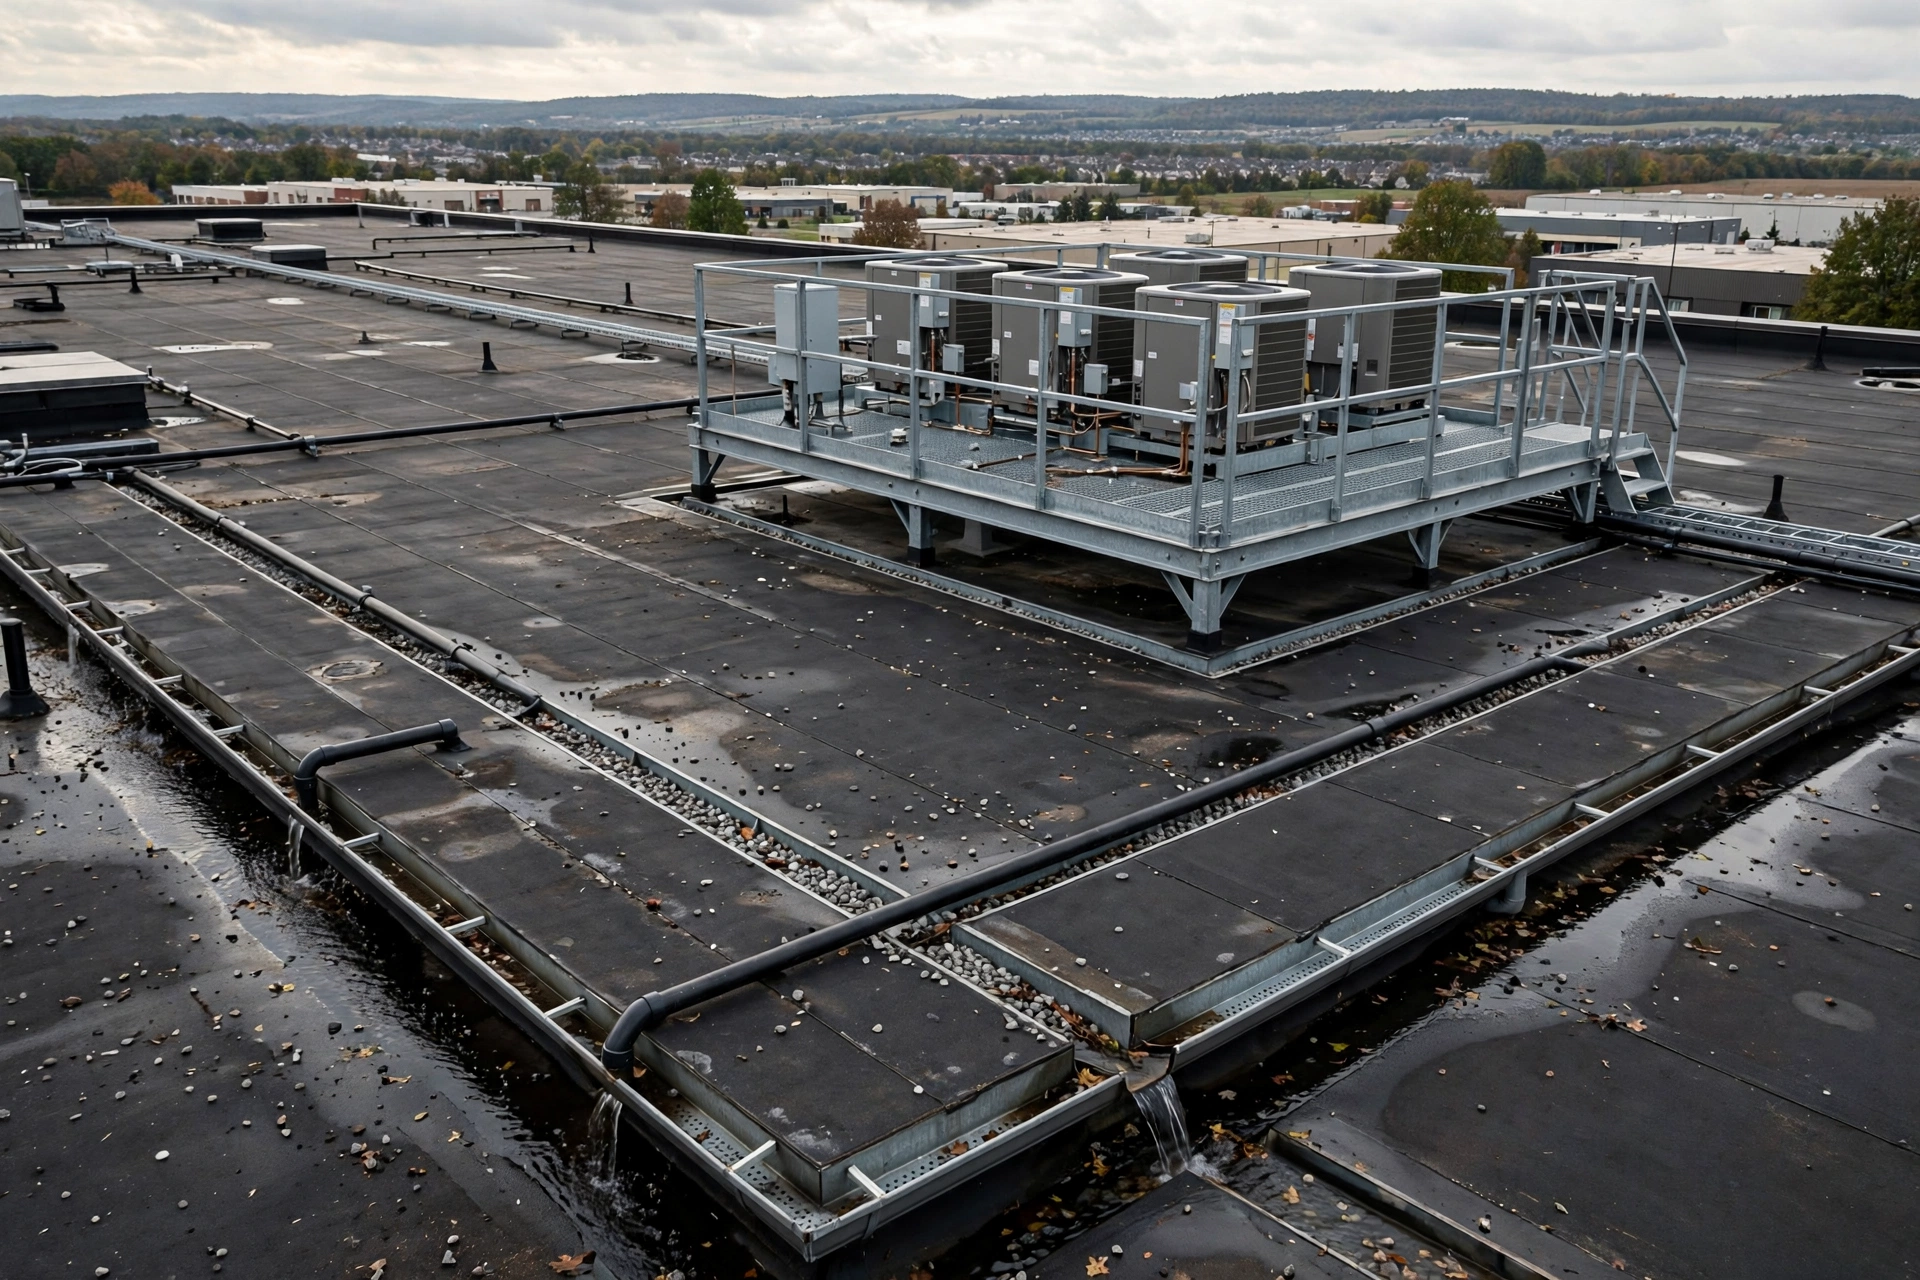
Walk across a flat residential roof and you will usually find the same picture: an air conditioning condenser, a vent pipe, a satellite dish, and a tangle of conduits, all sitting wherever the installer found it convenient. Technicians cross the membrane to reach them, toolboxes scrape the surface, and every visit leaves the roof a little more worn. Worse, the equipment often sits directly in the path water takes to the drains, so a heavy storm ponds around the units and finds the weakest seam.
The short answer is that a dedicated roof equipment service zone groups every rooftop unit into one defined area, reached by protected walkways, with drains and overflow paths kept clear around it. The zone gives technicians safe footing and clear access, while the roof keeps doing its real job, which is shedding water. It takes planning, but it costs far less than a membrane torn by foot traffic or a leak that starts at a drowned curb.
Why Rooftop Equipment Needs Its Own Defined Service Area
A roof membrane is designed to shed water, not to survive daily foot traffic. Every service visit brings boots, ladders, toolboxes, and replacement parts across the surface, and the wear concentrates wherever the route to the equipment runs. Without a defined zone, technicians choose a different path each time, which spreads the damage across the whole roof instead of confining it to one protected strip.
A defined zone also ends the argument about who is responsible for what. When the equipment area has a clear boundary, the roofing contractor owns the membrane and the flashing up to that line, and the HVAC contractor owns the equipment and its curbs inside it. That clarity matters when a leak appears, because the first question is always whether the water came through the roof or through the equipment, and a mapped zone makes the answer easy to find.
How to Lay Out a Roof Equipment Service Zone Around Existing Units
Start with a roof plan that shows every unit, every drain, and every existing penetration. Group the equipment that needs frequent service, usually the air conditioning condensers and the ventilation units, into one compact area near the roof access point, so technicians cross as little membrane as possible. Units that need rare attention, such as a vent stack or a small exhaust fan, can sit outside the zone if moving them would cost more than the protection is worth.
- Place the zone near the roof hatch or ladder to shorten the access route
- Keep at least three feet of clear working space on the service side of each unit
- Leave the path to every drain and scupper outside the equipment footprint
- Mark the zone boundary with walkway pads so it is obvious underfoot
Measure twice before committing. A condenser needs clearance for airflow as well as for hands, so the manufacturer’s minimum distances come first, and the zone boundary follows them. Where two units stand close together, leave enough room between them for a technician to kneel and work, because a zone that is too tight just pushes the damage to the membrane beside it.
Walkway Pads and Protection Mats That Spare the Membrane
The cheapest protection on a roof is a walkway pad. These are dense rubber or PVC mats laid on the membrane along the access route and around each unit, spreading the load of boots and equipment so the membrane underneath is not punctured or abraded. They are usually loose-laid or lightly bonded, which means they can be lifted for inspection, and they should contrast in colour with the membrane so the safe path is obvious even to a technician visiting for the first time.
Choose pads rated for the roof system in place, because the wrong adhesive or the wrong material can react with the membrane. On single-ply roofs, use pads recommended by the membrane manufacturer, and never drag a heavy unit across an unprotected surface. A compressor change on a bare membrane can tear a seam in seconds, while the same job on a protected walkway leaves no trace at all.
Keeping Drains, Scuppers, and Overflow Paths Clear of Equipment
Water on a flat roof has to travel to a drain, a scupper, or an overflow, and anything in its path slows it down. Equipment curbs, support rails, and conduit runs act like small dams, and the pond that forms behind them soaks the membrane and the flashing for hours after every storm. The layout rule is simple: no equipment, curb, or support should sit between a large roof area and its nearest drain.
| Drainage feature | Clearance to keep | Why it matters |
|---|---|---|
| Primary roof drain | Three feet clear in every direction | Lets water reach the drain without detour |
| Scupper or overflow | Full width of the opening, no obstructions | Overflow must work when the primary clogs |
| Valley or low channel | No curbs or rails crossing it | Channels carry the most water in a storm |
| Cricket or diverter | Keep its uphill face open | Diverters only work if water reaches them |
After a heavy rain, walk the roof and look at where water stands. Ponding that lasts more than two days after a storm, or water that regularly reaches a curb base, means the layout needs adjusting. Moving a small unit a few feet, or adding a cricket that diverts water around a large curb, can fix a pond that sealant never will.
Curb Flashing and Equipment Bases That Shed Water Properly
Most rooftop equipment sits on a curb, a raised frame that lifts the unit above standing water and gives the flashing something to seal against. The curb only works if its flashing is continuous and its top edge is high enough. On a flat roof the curb should rise at least eight inches above the membrane, and the flashing should run up the curb face, over the top edge, and under the unit base, with no gaps at the corners.
Corners are where curb flashing fails first, because the membrane has to fold in three directions at once. Prefabricated corner pieces, or a careful sequence of cuts and patches sealed to the manufacturer’s instructions, hold up far better than a single sheet forced around a corner. Inspect curb flashing every year, and after any storm that drives rain sideways, because a loose corner lets water under the membrane where it can travel a long way before it shows inside.
Separating Condensate Drains From Rainwater Runoff
Water around a rooftop unit is not always rainwater. An air conditioner produces condensate all summer, and if its drain line ends on the roof surface, that water joins the rainwater and can confuse every drainage observation. Worse, a blocked condensate line can flood a curb base while the sky is clear, and the stain it leaves looks exactly like a roof leak.
- Route condensate lines to a dedicated drain, not onto the open membrane
- Keep the condensate outlet visible so a blockage shows up fast
- Never let a condensate line discharge into a scupper or overflow path
- Check the trap and the pan at every seasonal service visit
Separating the two water sources also makes diagnosis honest. When a wet patch appears and the condensate line is known to be clear and routed away, the roofer can focus on the membrane. When the condensate line is the suspect, the HVAC technician owns the fix. That division saves the most expensive part of any roof problem, which is the time spent arguing about whose water it is.
Safe Access Routes and Fall Protection for Service Visits
A service zone is also a safety zone. Technicians carrying parts across a wet membrane near a roof edge are at real risk, and a defined route with handholds, a stable hatch, and clear footing reduces that risk more than any warning sign. The access route should avoid roof edges where possible, and where it cannot, a guardrail or a clearly marked keep-clear strip should separate the walkway from the drop.
Keep the route free of trip hazards. Loose cables, abandoned conduit, and stacked spare parts turn a safe path into an obstacle course, and they also trap water against the membrane. A service zone with a small storage rack for spares and a rule that nothing is left loose on the roof stays safer and drier than a roof that doubles as a storeroom.
A small logbook kept at the roof hatch, or a shared note on a phone, makes the zone safer over time. Each visit gets a line: the date, the weather, what was checked, and what looked different. A technician who arrives six months later can read the last three entries and know immediately whether the pond by the north curb is new or normal, which is far better than relying on memory.
Seasonal Checks That Catch Ponding Before It Damages the Roof
A roof equipment zone needs a seasonal routine, and the best time for it is after the first heavy rain of each season. Walk the zone and look at the drains first: a strainer clogged with leaves is the most common cause of ponding, and clearing it takes minutes. Then look at the curbs and the flashing for gaps, and at the walkway pads for shifting or curling edges that could trip a technician or expose the membrane.
- Clear drain strainers and scuppers after the first heavy rain each season
- Check curb flashing corners for lifting or gaps
- Confirm walkway pads still cover the full access route
- Look for debris trapped against curbs that could dam water
Photograph anything that looks different from the last visit. A small pond in the same place every spring is a pattern, not a coincidence, and a photograph makes it easy to show a contractor exactly where the water sits. Over two or three seasons, those photographs build a record that turns guesswork into a plan.
Winter deserves its own check. Snow piled against a curb melts slowly and can sit against flashing for weeks, so clear snow away from equipment bases after a heavy fall rather than letting it melt in place. Condensate lines are also at risk in a cold snap, so confirm the trap is full and the line is insulated or heat-traced where it runs across an exposed roof. A frozen condensate line backs water into the unit just as surely as a clogged one does in summer.
Coordinating Roofing and HVAC Contractors at the Zone Boundary
The boundary of a service zone is where two trades meet, and that is exactly where work falls through the cracks. The roofer seals the curb flashing, the HVAC technician bolts the unit to the curb, and each assumes the other checked the seal between them. A written handover fixes this: when a unit is installed or replaced, the installer photographs the curb, the flashing, and the unit base, and both contractors sign off that the weather seal is complete.
The same coordination matters when equipment is added later. A new condenser placed without consulting the roofer can land across a drainage channel or on top of a seam, and the leak that follows gets blamed on the roof. A short conversation before the crane arrives, with the roof plan in hand, costs nothing and prevents the most common kind of rooftop argument.
Roof Equipment Service Zone Questions Answered for Homeowners
How big should a roof equipment service zone be?
Big enough to give each unit its manufacturer-required clearance plus three feet of working space on the service side, and to include a protected walkway from the roof access point. For a typical home with one or two condensers, a zone of roughly ten by twelve feet is a practical starting point.
Do walkway pads damage the roof membrane?
No, when they are the right type for the membrane. Pads spread foot traffic and protect the surface from punctures and abrasion. Use pads recommended by the membrane manufacturer, and avoid adhesives that are not compatible with the roof system, because the wrong adhesive can harm the membrane it is meant to protect.
Can equipment sit over a roof drain?
It should not. A unit, curb, or support over a drain blocks water and hides clogs, and it makes the drain impossible to clean without moving the equipment. Keep at least three feet clear around every primary drain, and keep scuppers and overflow paths fully open.
How often should a rooftop service zone be inspected?
At least twice a year, in spring and autumn, and after any storm that drops heavy rain or hail. Check the drain strainers, the curb flashing corners, the walkway pads, and the condensate lines. A ten-minute walk after the first big rain of the season catches most problems while they are still cheap.
Who is responsible when a leak starts near rooftop equipment?
It depends on the source, which is why a defined zone helps. The roofing contractor owns the membrane and the curb flashing, and the HVAC contractor owns the equipment and its connections. A written handover with photographs of the curb and flashing at installation time makes it easy to tell which side the water came from.
Final Thoughts: A Well-Planned Service Zone Keeps the Roof Draining
A roof equipment service zone is a small act of organisation with a large payoff. Group the units, protect the path to them, keep the drains clear, and write down who owns each seam. The roof keeps shedding water the way it was designed to, technicians work safely and quickly, and the membrane lasts its full life instead of wearing out along a dozen informal paths. Water and work can share a roof, but only when each one has its own clearly marked place.